Monday, January 31, 2011

Bracketing with Ease

I'm going to do this post in two sections for those of you that got lost at the word bracketing. Section one will give a small explanation about bracketing. Section two will explain about AEB and how it makes bracketing a cinch.

Section One: What is bracketing?

I will do my best to explain bracketing without turning this post into one on F-Stops and Shutter Speeds. I'm hoping that you all understand these two terms. If not, fear not, there will be posts coming up that go into more detail on both counts.

Say you go to photograph the field next to your house to create a HDR image and the correct exposure is f-11 at 1/125. To keep the correct exposure you would use the "take a stop/give a stop" rule. In this case we don't want to keep the correct exposure. We want to over expose by 2 stops and under expose by two stops. You can do this by either changing the shutter speed or the f-stop.

Here is what your exposures would look like for that image if you changed your f-stop 2 stops in either direction.

f-5.6 @ 1/125     f-11 @ 1/125       f-22 @ 1/125

Here is what your exposures would look like for that image if you changed your shutter speed 2 stops in either direction.

f-11 @ 1/30     f-11 @ 1/125       f-11 @ 1/500

In a nut shell, bracketing is when you take multiple shots of a subject changing the setting on your camera. Typically you wouldn't bracket your shots by 2 stops. I used that example because in the previous post I talked about creating HDR images and you want your shots 1 to 2 stops over and under exposed for creating beautiful HDR images. When bracketing for correct exposure you may only choose to compensate 1/3 or 1/2 stop in each direction.

Section 2: Using the AEB setting on your camera.

Many Digital SLR camera have an AEB (Auto Exposure Bracketing) setting. This makes bracketing easy. Once set up you can take 3 consecutive shots and the camera will adjust the shutter speed and aperture for you. You can set the AEB to bracket for you in 1/3 step increments.

I'm not going to do a tutorial on setting up AEB on your camera at this time. A would highly recommend reading your user manual for your camera and learning the exact directions for your specific SLR. Using AEB can save you a lot of time if you are shooting many images for HDR photography or if you choose to bracket all your shots for correct exposure.


Friday, January 28, 2011

Photomatix Pro

I love this program for creating HDR Images. It's easy to use and my pictures look great every time. Let me give you a quick tutorial, show you some of the images I've created and then I'll tell you where you can get the program.

Step 1. You will need a bracketed photo. Generally one that is properly exposed and then the same image +2 stops and again -2 stops. The result will be something that looks like this.


Step 2: Open Photomatix Pro and drag the 3 bracketed images into the open program. It will give you a dialog box that looks like this.


Choose Merge for HDR Processing and hit ok. This will give you a new dialog box where you can choose additional image if you need to.


You can just click ok unless there are other images you need to select. You will then get a third dialog box that looks like this.


I choose to Align images by matching features. You can choose other options as you wish. When you click ok on this screen it will bring you into the program. Here is an example of what you will see.


Step 3: On the left side of the program you will see a tool bar with various sliders. Use those to tweak your image. If you need someplace to start there are preset thumbnails at the bottom that you can click on and adjust from there. When you have your image looking how you want click, Process in the lower left corner.

Step 4: Click File>Save As and save you image with the file name and extension you wish.

Here is the final bench image with the 3 bracketed images across the top for effect.


HDR image are beautifully brilliant. I love the results and using Photomatix Pro makes the process simple. You can create HDR images in Photoshop. I may even do a blog post on it at some point, but I just love Photomatix Pro. Here are some other images I've created using this program.


If your sold and absolutely have to own this program you can buy it today at amazon.com. There are also many books on HDR techniques on Amazon. You can see a list of them here.


Wednesday, January 26, 2011

Understanding Histograms

Histograms are a great tool for photographers. It lets you see in graph form the exposure of you image. Histograms shouldn't be a replacement for creative genius. Depending of the circumstance you may want your image over or under exposed. These are called High Key and Low Key images and can be very stunning. Here is a chart that will help give you an idea of what your looking at when you see a histogram. A histogram is set up where the dark pixels are on the far left and gradually get lighter as you move to the right, with pure white being at the far right. (As shown by Axes 1) The amount of dark or light pixels will be shown vertically. (As shown by Axes 2.).


Now lets look at some real photos and the histograms that go with them. This first one is a picture of fireworks I took during a 4th of July Celebration. Under it you will see the histogram for this image. Do you notice how most of the information is to the left of the graph? If you were to rely strictly on the histogram it is telling you that this image is very under exposed. This is a case where you want it to be. You wouldn't see the contrast on a beautiful firework against the black sky if this was properly exposed according to the histogram.


Now lets look at another example. Here is a picture I took in my mom's garden last year. You can see from looking at it's histogram that the majority of the information is towards the right side (or the light side) of the graph. But you can tell by looking at it that it's not blown out, it doesn't matter what the histogram is telling you.


 Now here is a photo that my histogram likes. (Personally, I like it too.)


See how the information is pretty even all across the graph? Now that's an example of a properly exposed image. :-)

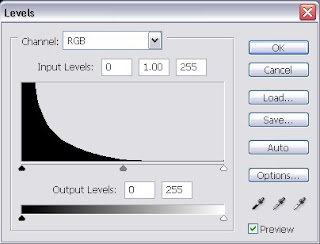
Now here is the shocker. You've just listened to me say over and over not to listen to the histogram and trust your eye and creative genius. I use histograms all the time. They do have a purpose. I use them most often in Photoshop to correct the exposure of images that I think are under or over exposed. (Not with creative intent.)


As you can see most of the data is on the left half of this histogram showing that it is underexposed. In this instance I want to lessen the gape between the light and dark pixels. To do this I'm going to click on the slider on the right and drag it to the left stopping where the information in the graph starts.


This is the resulting image. Much better I think. Another way to use your histogram is right on your camera. There are some situations where you might be shooting and can't trust the thumbnail on the LCD to tell if your image is properly. Such as if you are shooting in bright sun you may not be able to see by looking at your LCD screen if the image is over or under exposed. This is a great time to utilize your histogram. In fact, I don't think there is a bad time. Just as long as you don't take what it's telling you as gospel.

Note: When an area of your photo is extremely over expose you will see a tall thin line way to the right of the graph. When an image is severely over or under exposed it results in lost data. This data can't be recovered by playing with Levels in Photoshop. Keeping an eye on your histogram will keep accidental spikes in the light or dark areas resulting in lost data.

Monday, January 24, 2011

Photo Assignment ~ 3 Feet of Rope

Today's assignment is to cut 3.5 feet of rope or yarn and tie one end to a door knob and the other to your belt loop. Now take 15 to 25 completely different pictures. This proves harder than it sounds. You will have to get pretty creative. No cheating, leave the door closed and stay in the same room. The point of this exercise is to spark your creativity. Can you take 25 different pictures while staying with in 3 feet of the door? This works well if you have a digital camera because you can see the pictures as you take them. With a film camera you will just have to wait until you develop the film. Here is an example shoot I did this morning. I was tied to the kitchen door.


Friday, January 21, 2011

50 Ways to Advertise Your Business

1. Place your business cards on bulletin boards around your local area. Check libraries, small businesses and tax preparation places.

2. Take out a listing in your local phone book. Look into both the yellow pages and the white pages.

3.  Get a Car Magnet that has your business website and phone number. Great free advertising everywhere you drive.

 4. Join Professional Photographers of America.

 5. Turn your favorite pictures into bookmarks and post cards then hit the craft fairs in your area.

6. Unique Business cards get you noticed. Try Wood, Metal, Plastic, Di-cut, Edible, 3D or USB cards. There are even ones that have seeds embedded in them.

7. Word of mouth is the best. Offer your current clients a discount if they refer friends and family.

8. Submit your work to Photo Contests.

9. Many Banks and Hospitals display local artist work. Contact  their HR departments for more information.

10. Put your logo and contact information on things such as pens and key chains that people can carry with them.

11. If you don't already have a website, get one. Here are some places that offer photography websites. BigBlackBag.com, www.ifp3.com, www.foliolink.com, www.wix.com.

12. Add your contact information as a signature on all your out going e-mails.

13. Mention you business in your home voice mail message.  "If you were trying to reach KDC Portrait Studio the direct line is (555) 555-5555 or you can leave your contact information here and I will get back to you as soon as possible."

14. Make a goal of handing out 10 business cards a day and stick to it.

15. Advertise your website on Twitter and make sure you have followers to read your tweets.

16. Get your  Business a Facebook page or post current and up coming news on your Facebook page.

17. Join other Social Networking sites.

18. Put your business info on clothing items such as hats and shirts that you can wear in public.

19. Wear eye catching photography related tee-shirts.

20. Visit trade shows. Make sure to offer something free if they sign up.

21. Join free traffic exchanges. Here are a few that I use. EasyHits4U, Traffic Era, HitSilo.

22. Submit your site to search engines such as Google, AltaVista, Bing and others.

23. Join Link Exchange websites.

24.  Sign peoples Guest Books online and leave a message to your website in the homepage field.

25. Do a web search for photography message boards. Some message boards will allow you to post links to your website.

26. Add a "Like Us" on Facebook link on your website. This will allow people who come to your site via other means to like you on facebook. Who knows, maybe some of their friends will like you too.

27. Become actively involved in camera clubs and art groups in your area.

28. Volunteer your services at events such as the Special Olympics and Relay for Life. Not only will this give you experience and add to your portfolio of images but they may let you put a stack of your business cards on the registration table.

29. Talk to your local news paper. They may to a small write up on you. (or use some of your pictures and give you a byline)

30. Offer to do mini photography classes for free. Call local churches, cub scout and girl scout groups. This is a great way to get involved in the community and you can send home a cheat sheet of photography tips on your letterhead.

31. Give Gift Cards as gifts at Christmas, Wedding, Birthdays, Baby Showers and any other celebration you are invited to.

32. Run a Contest. Offer a prize that people will be interested in. Everyone that enters is a new perspective client.

33. Donate a framed piece of your art work to be used a door prize. Many events and fundraisers offer door prizes.

34. Ask friends and family to put a link to your website on their website or blog. The more link to your site the better it will rank in search engines.

35. Get on the phone. Call businesses, friends, family, colleges and let them know what you do. Ask them for referrals or suggestions of where to advertise.

36. If you can afford it put out an add on a local radio station. Many people listen to the radio while the work or drive.

37. Some movie theaters are now running local adds while waiting for the movie to start. Contact your local movie theater to see if they offer this.

38. If you work from home consider getting a yard sign. Place it in your front yard in a highly visible area.

39. See if your Local grocery store allows adds on the back or their receipts. If so, contact them and ask what their advertising rates are.

40. Print up book marks with your business information on them and donate them to local libraries and colleges.

41. If you can afford it have mini desktop calendars printed up using your pictures and contact information. Donate these to local companies to give to their employees.

42. Contact your local fire company. See when they are having their next fundraiser and see if you can set up a booth.

43. Set up a booth when the fair comes to town. People enjoy spending money at the fair. Include your business card in the bag with what they ordered.

44. Some credit card companies set you upload your own image to put on your card. This could be a great conversation starter.

45. Contact local high schools about taking out an add in the back of their yearbook. In most cases this will run you abut $25.

46. Get a bumper sticker or vinyl lettering for the back of your vehicle. That will allow drivers behind you to see your business info too.

47. Get a blog and network with other blogs in the same niche.

48. Get a wibiya tool bar. This will let other who find your site easily share it with others.

49. Network with other photographers in your area. Don't be afraid to send customers their way if you are over booked. They may return the favor.

50. Co-sponsor a local sporting event or concert.

Saturday, January 15, 2011

A Little Extra Protection for Your Photos

I will cover filing your images with the Copy Right Office and using Watermarks in another blog post. Today I want to spend a minute and show you another way you can help protect your images using EXIF. It stands for “Exchangeable Image File Format” and is metadata that is saved in text format and embedded in the photograph. You can quickly and easily do this in Photosho, let me show you  how.

First a few word about EXIF. I've told you what it stands for but you still might not have an idea what it is. The EXIF can store information such as photographer name, location, camera data, and copyright information. The data is stored with the image and can be viewed online or in programs such as Photoshop.

Open in Photoshop the image you would like to add information to. Click File> File Information (Alt+Shift+Ctrl+I) and you will get a pop up window that looks like this.


You can click through and add as much or as little information as you want. There is even a place close to the bottom where you can pick Copyrighted from a drop down menu and add your own Copyright Notice. I add my website next to Copyright Info URL.

When you have added all the information you want to, click OK and then save your file as you normally would. Your image won't look any different but you will notice a small © in the image header next to the file name.

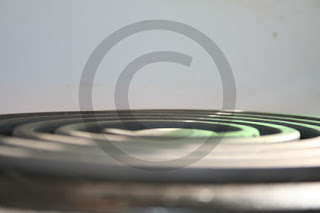
You can check the EXIF info on any image online or on your pc using this free EXIF viewer. http://regex.info/exif.cgi.  Just use the images url or search for a file on your computer. Feel free to use the image below to test the free viewer. Just click on it and copy and paste the url into the Image URL section of the Regex website.


Tuesday, January 11, 2011

Desaturation vs. Calculations

Don't worry if the title left you scratching your head. This post is all about B/W photos and by the end I hope you will understand the difference between using desaturation to turn you images B/W and using Calculations.

Here is a quick run down on how to use the Hue/Saturation tool in Photoshop to create a B/W image. Once your image is open go to Layer> New Adjustment Layer> Hue/Saturation. You will get a pop up window that looks like this.

Drag the slider under Saturation all the way to the left and hit ok. (Make sure the Colorize box is not checked, if it is your image won't be B/W. It will be Sepia or some other duo-tone.) There, you have just created a B/W image.

Next I will go through the steps for making a B/W image using Calculations. Open the image you want to use in Photoshop. Choose Image> Calculations from the menu at the top of the program.


You will get a pop up window like this one below.


Now you can take turns changing the colors in the Channel drop down menus in Source 1 and Source 2 until your image begins to look how you want it to. Try several combinations such as Red in Source 1 and Blue in Source 2 or Green in Source 1 and Red in Source 2. There isn't a wrong or right combination. You can also in the drop down menu next to Blending choose from numerous options and then play with the Opacity. You should choose New Document next to Result to have the new B/W image opened as a separate document from the color one with which you started.


 Note: After creating a New Document you will want to go to Image> Mode and change it from Multichannel to Grayscale. If you don't do this it won't give you the option to save it as a JPG or TIFF file. You also won't be able to add any Adjustment Layers until after you have changed Modes. Here are two examples of B/W images I made using both the Hue/Saturation tool and using Calculations.


 Hue/Saturation
Calculations


 Hue/Saturation

 Calculations


Play around with your photos and it won't take long for you to decide which tool you prefer for making B/W images. There is no right or wrong answer to this one. It's all photographers preference.